Spring is right around the corner, which means it’s time to start thinking about how to dewinterize your RV for spring and wake it up the right way. After months of sitting idle, your RV needs more than just a quick rinse and a fresh tank of water. Skipping key steps can lead to costly repairs, frustrating breakdowns, and power system issues that show up at the worst possible time, your first trip out.
A thorough dewinterizing process protects your plumbing, electrical system, batteries, and appliances so you can hit the road with confidence. Taking the time now to carefully inspect and test each system ensures your camping season starts smoothly and stays that way.

Wake Your RV Up: Learn How to Dewinterize your RV
Dewinterizing is for weekend campers, full-timers, and casual boondockers itching to get back on the road. You’ve already done the hard work of prepping for cold weather, but what does de-winterizing actually mean? To put it simply, it’s the process of reversing your winter setup and getting all your systems warmed up, cleaned out, and ready for the season ahead.
While ABC Upfitters is always happy to handle the electrical side of this for you, it’s helpful to understand what’s involved. So, whether you’re a DIY type or just want to know more about what’s happening underneath the hood, let’s walk through how to de-winterize your RV and get road-ready for spring.
Step 1: Inspect Before You Touch Anything
Start with a visual check and inspect your RV before you touch anything. You’re looking for cracks, leaks, visible damage, or any sneaky pests that may have moved in over the winter and caused issues. Next, check your tires for signs of dry rot and make sure they’re properly inflated to the correct PSI. It’s also a smart idea to inspect your roof, seals, solar panels, and slide-outs to confirm everything is secure and in good shape before hitting the road.
Why this step saves you money: Catching small problems early—like a tiny leak, cracked seal, or low tire pressure—can prevent much bigger (and more expensive) repairs down the road. A quick inspection now can save you from breakdowns, water damage, and timely wasted trips later.

Step 2: Flush and Sanitize Your Water System
Let’s start with the basics of your fresh water system when thinking about how to dewinterize your rv. First, you’ll want to drain all the antifreeze from your fresh tank, water lines, and water heater. This clears out anything left from winter storage and gets your system ready for clean water again.
To flush the system properly, use fresh water and run each faucet until the water runs clear. Be sure to include every water source. Once everything is flushed, it’s time to sanitize. This step is critical because it removes bacteria, mold, and that stale taste that can build up over time. The simplest method is to use a diluted bleach solution (or an RV-safe sanitizer), let it sit in the system for a few hours, and then flush everything again until any odors are completely gone and the water smells fresh.
Step 3: Reinstall or Bypass the Water Heater
At this point in the process, you’ll need to put your water heater back into “normal mode” so it can start heating water again. During winterization, most RV owners either bypass the water heater or remove the drain plug to prevent freezing—now it’s time to reverse that setup.
Start by reinstalling the drain plug, making sure it’s secure and properly sealed. If your system was set to bypass, switch the valves back so water can flow into the tank again. Once that’s done, turn on your water pump or connect to city water and allow the tank to completely fill.
Before powering the heater on, open a hot water faucet inside your RV and let it run until the air sputtering stops and you get a steady stream of water. This confirms the tank is full.
Never turn on a water heater when it’s empty or “dry.” Doing so can burn out the heating element or cause serious damage. This is an expensive mistake that’s easy to avoid with this simple check.
And finally, do not skip a roof and seal inspection. Small cracks or dried-out sealant can quickly turn into water damage once spring rains hit.
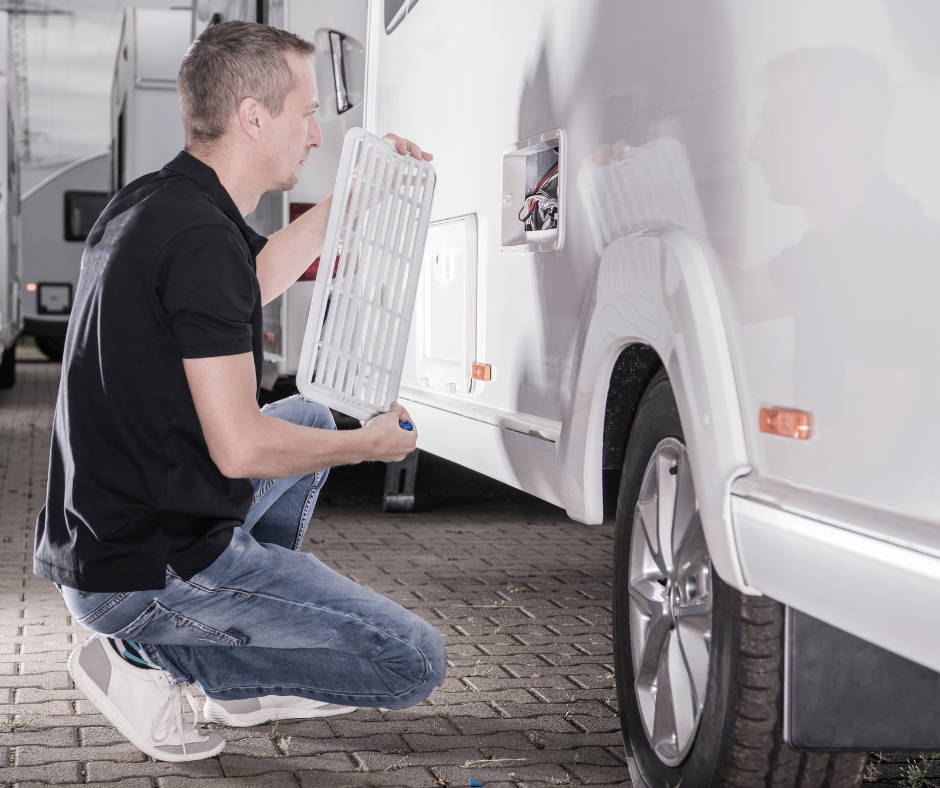
Step 4: Check Your Electrical & Battery System
If you’re learning how to dewinterize your RV, don’t stop at plumbing. Your electrical system deserves just as much attention, especially if you love to boondock. At ABC Upfitters, we see it every spring: batteries that weren’t properly maintained and power systems that no longer support their owners’ lifestyle.
For off-grid travelers, ignoring battery health is a costly mistake. Weak connections, low charge levels, or aging batteries can derail your first trip in a hurry.
Start with the basics. Inspect your battery terminals for corrosion, loose connections, or damaged cables. Clean and tighten everything so you’re starting the season with solid, reliable connections. Next, check your charge levels. Regardless of what battery type you are using, take the time to confirm they’re holding a proper charge.
Then move into testing your full system:
- Turn on your inverter and confirm it’s powering outlets correctly.
- Plug into shore power to ensure your charger is functioning/ batteries are charging properly.
- If you have solar, verify your panels are producing power and your charge controller is reading accurately.
For off-grid RVers, this step is about more than just checking boxes. It’s about confidence. Spring is the perfect time to evaluate whether your battery bank, inverter capacity, and solar array still fit your travel style. If you’re staying out longer, running more appliances, or working remotely from the road, your power system may need to grow with you.
Step 5: Test Appliances & Safety Gear Systems
As you finish learning how to dewinterize your RV, take time to run every major appliance and system at least once. Turn on your fridge in all operating modes, and confirm it cools properly. Fire up the furnace, test the AC, run the water pump, and check your propane system for smooth ignition and steady operation. Pay attention to error codes, unusual smells, or weak performance.
As far as safety features go, don’t overlook the components that protect you on the road. Before your first trip, check tire pressure and inspect your tires for cracks, uneven wear, or dry rot from sitting over winter. Have your brakes inspected or at least listen for unusual noises during your first short drive.
Inside the RV, test your smoke detector and carbon monoxide detector to ensure proper function and replace batteries as needed. Finally, confirm your fire extinguisher is fully charged and easily accessible. A few minutes spent on safety now gives you confidence for every mile ahead.
Starting the Season with Confidence
Once you’ve worked through how to dewinterize your RV, spring becomes more than just a season of maintenance. It is the upgrade season. This is the perfect time to expand your battery bank, add or upgrade solar, improve your inverter or charging system, and finally fix the power pain points that frustrated you last year.
For many boondockers, last season revealed the weak links. Maybe you ran out of battery sooner than expected. Perhaps your inverter struggled to keep up. Or maybe your solar simply wasn’t producing enough to match your travel style. Instead of repeating the same limitations, use this moment to build a system that truly supports how you camp.
Need Help Upgrading?

If last season taught you anything about your power system, now is the time to fix it before your first off-grid trip.
Need help upgrading your RV power system for the season? ABC Upfitters specializes in off-grid and boondocking setups so you can camp longer, smarter, and stress-free.
Frequently Asked Questions:
1. What is the most important step when learning how to dewinterize your RV?
While every step matters, flushing and sanitizing your water system is critical. Removing antifreeze, clearing the lines, and sanitizing the fresh water system protects your health and prevents unpleasant odors or bacteria buildup. Skipping this step can lead to contaminated water and bigger plumbing issues later. If you would rather have a professional handle it, ABC Upfitters can ensure your system is properly flushed, sanitized, and ready for the season.
2. Do I really need to check my batteries and solar system in the spring?
Yes, especially if you boondock or camp off-grid. Winter storage can lead to loose connections, low charge levels, or declining battery health. Spring is the perfect time to inspect terminals, test your inverter, confirm shore power charging, and make sure your solar system is producing properly. ABC Upfitters specializes in off-grid power systems and can help diagnose issues or recommend smart upgrades before your first trip.
3. When should I consider upgrading my RV power system?
If you ran out of battery last season, struggled to power appliances, or found your solar was not keeping up with your travel style, spring is the ideal time to upgrade. Expanding your battery bank, improving your inverter, or adding solar can dramatically improve your off-grid experience. ABC Upfitters works specifically with boondockers and off-grid RVers to design power systems that match how you actually camp, so you can travel longer and more confidently.
You May Also Like:
- Tips for Storing your Solar Powered Camper in the Winter
- How to Upgrade Batteries for Campers
- RV Tailgate Power Guide: Keep the Party Going All Day
About ABC Upfitters:
ABC Upfitters provides premium, customer-focused, upfitting services to RV clientele who are looking for the ultimate off-grid experience. The close-knit company originated from the rising demand for aftermarket Li-Ion battery upgrades for recreational vehicles. By using technical components, ABC can meet this need and provide an unmatched level of integration and quality for their customers. Contact one of the ABC team members today to learn about their services!